
Data Acquisition Using LabVIEW
DAQmx is the LabVIEW driver that has significantly simplified the programming of data acquisition hardware in LabVIEW. The following are the definitions related to DAQmx.
- Physical Channel: A physical channel is a terminal or pin at which an analog or digital signal is measured or generated.
- Virtual Channel: A virtual channel is a collection of property settings that can include a channel name, a physical channel, input terminal connections, the type of measurement or generation, and scaling information.
- Task: A task in NI-DAQmx is a collection of one or more virtual channels with timing, triggering, and other properties.
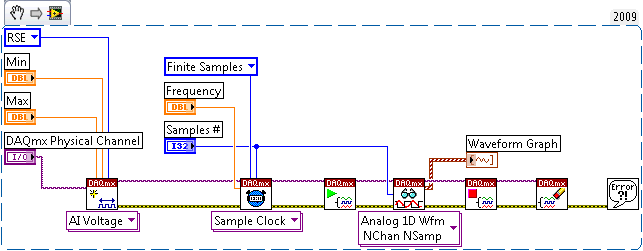
Figure 1. Sample code for data acquisition
The steps for data acquisition programming in LabVIEW are straightforward. Figure 1 is the example code for data acquisition. If you have LabVIEW 2009 or higher, you can copy the code to the block diagram (save it as a PNG file and drop the file on to the block diagram). All the DAQmx VIs in the example are polymorphial VIs, whose functions can change according to the selections under the VI icons.
- Create an analog input voltage channel. It adds the scaling information. The output is a task.
- Setup the timing for the acquisition. In this example, the Sample Clock is generated internally by the board. Rate specifies the rate of the internal clock. The timing is set to take a finite number of samples. The number of samples is specified by the Samples per Channel control.
- Define the parameters for a Digital Edge Start Trigger. This is optional and can be adjusted according to the trigger source.>
- Call the Start VI to start the acquisition.
- Use the Read VI to read multiple samples from the channel on the DAQ device. The total number of samples to read is left empty so that the default value of -1 is used, indicating that the VI should read all the samples defined in Step 2. Also set a timeout so an error is returned if the samples are not returned within the specified time limit. Because this example has a start trigger, 10 seconds was chosen as an arbitrarily large number to allow for the trigger to occur.
- Call the Clear Task VI to clear the Task.
- Use the popup dialog box to display any errors.
Center for Biotechnology
| Department of Biomedical
Engineering | Stony Brook
University | Contact
Copyright 2006, All rights reserved.
Copyright 2006, All rights reserved.